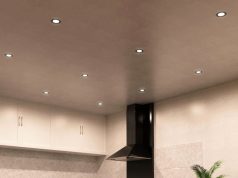
Designed to slow the spread of fire through your ceiling, fire-rated downlights can save lives. They’ll give you more time to escape, as well as provide firefighters a chance to do their job before the roof caves in.
Still, they only work if installed correctly. Botch it, and you’re not just breaking the law—you’re putting everyone at risk. Not a great look.
In this guide, we’ll walk you through everything. Learn how to install fire-rated downlights, what tools you need, and more below.
Ready? Let’s get into it!
Understanding Fire-Rated Downlights
Any average plasterboard ceiling can hold fire back for a while. But once you carve a hole for a light, that resistance goes out the window.
Unless you install fire-rated downlights!
These recessed lights stop fire from spreading through the holes you cut in your ceiling. They come with built-in intumescent materials that expand with heat. So, if there’s a fire, the gap seals up and slows the spread. Genius, right?
Plus, you can get different ratings—30, 60, or 90 minutes. Pick based on your ceiling type and local regs.
Regulations and Standards
In the UK, there are rules regarding downlights. Lots of them, in fact!
Start with Approved Document B, which covers building fire safety. Then, there’s the IET Wiring Regulations (BS 7671), which is basically the electrician’s Bible.
Additionally, don’t ignore the manufacturer’s instructions. They know their product better than you, Google, and your mate Dave combined.
Compatibility
Not every downlight fits every ceiling.
Timber? Concrete? Suspended ceiling tiles? You need to match the light to the surface.
Get it wrong and you could ruin your fire rating or create a lovely path for flames. Not ideal.
Tools and Materials
Now that you know the basics, let’s get your gear sorted. You can’t install anything with bare hands and guesswork, after all.
Essential Tools
You’ll need the right tools to avoid turning your ceiling into Swiss cheese.
- Drill
- Hole saw (get the right size, please)
- Wire strippers
- Spirit level
- Voltage tester
- Screwdrivers
Required Materials
No materials, no lights. Aside from the fire-rated downlights themselves, here’s what needs to go in the shopping basket:
- Fire-resistant cables
- Junction boxes or connectors
- Fire-rated sealant or gaskets
- Cable clips
- Some patience
Safety Equipment
Look, you’re not indestructible. Wear the proper gear or risk looking like an accident report.
- Safety goggles
- Gloves
- Sturdy footwear
- A step stool or ladder (get one that doesn’t wobble like jelly)
Step-by-Step Installation
Next, it’s time to learn how to install fire-rated downlights. Follow these steps, and try not to mess it up.
Step 1: Planning and Preparation
A little planning now can spare you a lot of swearing later.
Start by turning off the power. Yes, all of it! Trip the breaker. Don’t just flick the switch and hope it’s off.
Next, sketch a layout. Space your lights evenly. Keep away from joists, pipes, wires, or that mystery lump in the loft you’ve been ignoring.
Mark your positions with a pencil. Double-check everything. Measure twice, drill once. Or don’t and regret it forever.
Step 2: Preparing the Ceiling
Don’t just start hacking holes. Do it properly.
Cut your holes using a hole saw matched to your light’s spec. Slow and steady wins this race. Go too fast, and you’ll end up with an oval instead of a circle.
Clean up the edges and vacuum the dust (unless you enjoy breathing plaster).
Step 3: Wiring the Downlights
This is the bit that can electrocute you, so better pay attention.
Use a heat-resistant cable. Run it from your power supply to each hole. If you’re daisy chaining, use junction boxes designed for lighting circuits.
Strip your wires neatly—no fraying. Connect live, neutral, and earth wires correctly. Use wagos or terminal blocks, not sticky tape and hope.
Still unsure? Here’s a basic wiring layout (keep it simple):
Power → Junction box → Light 1 → Light 2 → etc.
Step 4: Installing the Downlights
If you’ve made it this far, don’t ruin it now.
Most fire-rated downlight packs come with spring clips. Push them into the hole, and the clips hold them snug. It’s not IKEA, but it’s not rocket science, either.
If your model needs fire-rated gaskets or sealant, apply them now. Seal any air gaps to keep the fire rating intact.
Step 5: Testing and Inspection
The lights are in—now make sure they work without drama.
Power back on. Flick the switch. If it lights up, well done. If it explodes or doesn’t turn on, you’ve done something very wrong.
Visually inspect your work. Look for loose wires, sagging, and scorch marks.

Important Safety Considerations
What could go wrong when dealing with fire, electricity, and downlights? Loads, actually.
Electrical Safety
Electricity is not a guessing game. Ever.
Turn off the power at the consumer unit. Check the wires with a voltage tester. Never assume they’re dead. Electricity doesn’t care about your optimism.
Fire Safety
These lights are about fire safety. Don’t compromise that.
Don’t install cheap knock-offs. Use actual fire-rated downlights. Use fire-resistant sealant. Don’t leave gaps. If in doubt, read the manual. Again and again.
Working at Heights
Don’t fall off the ladder. It’s embarrassing and painful.
Use a ladder that doesn’t wobble. Keep tools off the top step. Don’t overstretch like a gymnast with something to prove.
Common Mistakes and How to Avoid Them
There are plenty of ways to get installing fire-rated bulbs wrong. Here’s how not to.
Incorrect Hole Size
Measure once, and you’ll end up cursing forever. If you don’t want that, do it properly.
If the hole is too big, your light will fall out. But too small, and it won’t go in. Either way, it’s a mess.
Measure your hole saw. Check your light’s cut-out size. Don’t guess. You’re not on a game show.
Improper Wiring
Bad wiring isn’t just wrong. It’s dangerous.
Loose wires can arc and cause fires. Wrong connections can trip circuits or fry your lights.
Triple-check your wiring. If you’re not confident, call an electrician. It’s not shameful. It’s smart.
Compromising Fire Integrity
If you mess with fire protection, you may as well not bother.
Don’t leave air gaps. Don’t skip the sealant. Don’t use standard downlights in fire-rated ceilings.
Every shortcut increases fire risk. Do it right, or don’t do it at all.
When to Call a Professional
Sometimes, you’re just not the right person for the job.
Complex Installations
Tricky layout? Unusual ceiling? Call someone who knows what to do.
If your ceiling’s made of concrete or you’re dealing with multiple zones, don’t wing it. You need help. Real help.
Electrical Expertise
Wiring isn’t a hobby. Get a sparkie.
Not sure how to wire a loop-in system? Don’t guess. Get a qualified electrician. They’ve trained for years. You merely watched a YouTube video once.
Building Regulations
If you’re unsure about the rules, ask someone who isn’t.
Still unsure about the rules? Contact your local building control. They’ll tell you what you need to know and what penalties you’ll face if you mess around.
Frequently Asked Questions
When do I need to install fire-rated downlights?
If your downlights are going into a ceiling that separates living spaces (like between floors), you legally need fire-rated ones. No exceptions, no shortcuts—unless you fancy explaining it to your building inspector.
Can fire-rated downlights be covered with insulation?
Only if they’re specifically designed for it. Look for “insulation coverable” on the spec—otherwise, you’re trapping heat and asking for trouble.
Are fire-rated downlights mandatory in all ceilings?
Nope, just in ceilings where fire protection is required—usually between different floors or escape routes. For single-storey rooms, it depends on the building regs and setup.
Do I still need fire hoods if I use fire-rated downlights?
Not usually. Fire-rated downlights do the job on their own—but check the manufacturer’s guidelines and local regs to be sure.
Can I install fire-rated downlights myself?
Technically yes—if you know how to install fire-rated downlights and follow building regulations. If not, get an electrician before you make an expensive (and potentially dangerous) mess.
Recap and Final Thoughts
Learning how to install fire-rated downlights isn’t rocket science—but it’s not a game of “close enough” either.
Follow the steps we listed above. Plan your layout, measure your holes, and all that jazz. Your home’s lighting and your well-being will depend on it.
Fire safety isn’t optional, and neither is doing the job right. If in doubt, get help. If confident, get cracking. Just don’t cut corners.
And if you need quality fire-rated downlights that meet UK regulations and won’t leave you weeping at checkout—go to Simple Lighting. We stock reliable, tested products that won’t set your ceiling (or wallet) on fire. You handle the install—we’ll handle the gear.


